


Lhasa Apso
Lhasa Apsos are affectionate and charming. They are known to be tolerant around children and other dogs, provided they have been well socialised from an early age – making them the perfect addition to any household.
Lhasas boast heavy, plush coats. They have a lot of hair that falls over the eyes – but doesn’t impair vision. The ears, legs, feet and tail are all well feathered. Their top coat is heavy, straight and hard – neither woolly or silky.
Known for their long, flowing coats which grow right down to the ground, Lhasas have extensive grooming needs. If you are wanting to keep the long coat, it will require daily brushing and grooming. A full coated Lhasa Apso is captivating.
Some pet owners may opt to have all the hair clipped off or trimmed to a manageable length. It can be a nice touch to leave the hair on the head longer and styling this individually in a top knot, plaited bun, ponytail, pigtails etc. using bright bands, clips, bows or ribbons.
Coat Type
Long / Flowing
Grooming Requirement
Bathe & Brush Out with Minor Trimming
Pet Grooming Option
Bathe & Brush Out with Clipper Trim
Grooming Notes
Always check with the owner which groom they would prefer – all off, trimmed, wrapped or long. Ensure they know the extent of maintenance needed for long coats
- Lhasa Apsos require daily brushing if their coat is going to be kept long. You should also be prepared to regularly bath the coat areas that tend to get mucky/dirty – around the feet and longer coat. You should allow up to 30+ minutes a day to brush and groom the coat.
- Keeping the coat long is tedious, so owners might opt to have the hair wrapped. This procedure should only be applied to clean, thoroughly dried coats. A matted and/or dirty coat should not be wrapped. Wrappings should be replaced once a week.
Grooming Guide
Prior To Bathing
- Pluck hair from the ear canal only as necessary
- Comb/Brush the entire coat to ensure tangles/matts are removed. Some intensive conditioner can be applied to serious matts/tangles that can be brushed out after bathing
If you are grooming a trimmed/clipped coat, remove excess coat before bathing using a long/medium comb guide
Drying The Coat
- Towel dry immediately after bathing, use a fresh towel each time one becomes saturated
- Once there is little/no water being absorbed by a towel, use a high-velocity blaster to remove excess water. Work from the rump forwards.
- Keep one hand on the dog at all times to stabilise and comfort it.
- Avoid adding tangles to the coat by keeping the airflow in a downward direction.
- When no water is being sprayed from the coat, finish drying using a heated stand dryer while brushing the coat – brush only where the air is striking the coat. This will straighten and fluff the coat.
After Bathing
When brushing use gentle strokes to avoid brush burn. Take extra care in sensitive areas such as armpits, inner thighs, ears, neck and tail. Take extra care in tangle prone areas such as legs, armpits, collar area, ears and tail.
- Use a damp cloth to go over the muzzle after bathing, wiping away tear stains
- Leave ears long
- Part hair down the centre of the skull, neck and body to the base of the tail
- Optionally clear the stop area with thinners or clippers
- Line brush/comb every inch of the coat right down to the skin, starting with the legs working from the feet upwards. Next brush the body, neck, ears and tail. Hold the coat out of the way, pat the coat with the pad of the slicker and pull the slicker away from the skin. Don’t move onto the next section until one section is tangle free
- Use an anti-static spray if static is an issue while brushing
- Check your work with a wide-toothed comb
- Lightly trim sanitary areas (under tail and tummy) with thinning scissors/clippers
- Shave paw pads with a #15-#40 blade or trim using safety scissors
- Neaten the undercarriage line
- Ensure to brush the coat between the toes to prevent matting and discomfort
- Round feet by first blocking the foot to form a square. Use long curved scissors to round the outline of the foot
- Hold the hair out of the eyes using bands, ribbons, clips etc as desired, when showing the long hair should be parted down the middle
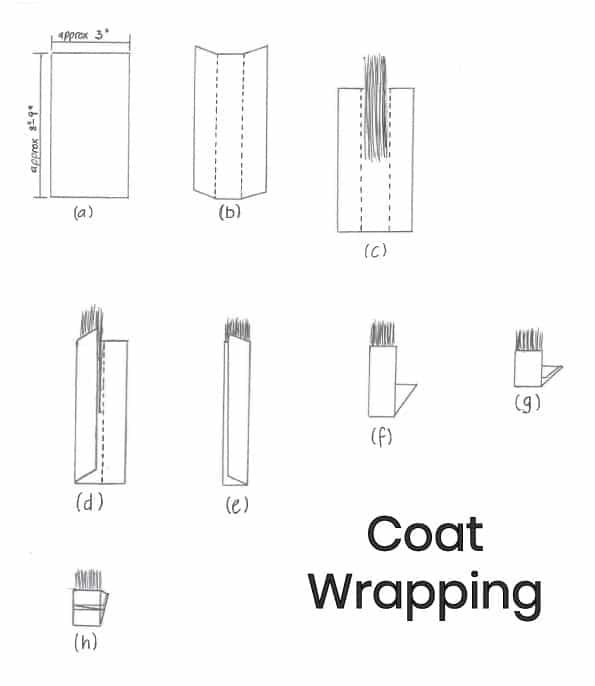
Coat Wrapping
It is best to learn this technique from a professional to avoid causing damage to the coat and discomfort to the dog
Wrapping the long coat is a great option to avoid the maintenance of daily brushing, prevent coat breakage/damage and keep the long coat clean. A lot of the products and technique for wrapping the coat is down to personal preference. There are a few key things to keep in mind for the comfort of the dog and also to not do more harm than good:
- Never wrap a wet, matted or dirty coat
- Wraps should be changed at least weekly or more often in humid climates
- Only the longer hair needs to be wrapped
- Ensure wraps are not tight to the skin or pulling coat uncomfortably. You should be able to get a comb through the hair between the wrap and the skin
- Ensure ear leather and/or skin has not been wrapped around the ears and tail
- Check that eyes, ears and lips are all comfortable to avoid unwanted discomfort or excessive scratching
- Use a porous material such as rice paper, to allow the hair to breathe
The hair wrapping technique is similar to getting ‘foils’ at the hairdresser. The number of wraps you need will depend on the thickness and length of the coat, but also on the size of the dog. It is best to learn this technique from a professional. As a general guide:
- Prepare 30+ wraps sized approx. 8 inches x 3 inches (Fig. a)
- Fold all your wraps into 3 lengthwise (Fig. b)
- Ensure coat is bathed, completely dry and tangle-free
- Spray coat with a leave-in conditioner or smoothing spray
- Split the coat into individual sections and loosely tie with hair bands
- Individually wrap each section
- Remove the loose hair band
- Place the section of hair halfway down the middle section of the wrap, allowing enough hair to be free at the top to avoid discomfort/pulling (Fig. c)
- Fold the outer sections of the wrap over the hair (Fig d & Fig. e)
- Fold the wrap up and under in half (Fig. f)
- Fold the wrap up and under in half again (Fig. g)
- Secure the wrap with a hair band (Fig. h)
- Repeat on each section of hair
Grooming Tool Recommendations
- Nail Trimmers
- Hemostats (Forceps)
- Clippers
- Slicker Brush
- Wide Toothed / Greyhound Comb
- Dematting Tools
- Pin Brush/Bristle Brush
- Straight Scissors
- Curved Scissors
- Thinning Scissors
- Detailing/Safety Scissors
- Blaster
- Finishing Dryer
- Or Combination Dryer
Other Health Recommendations
Clipper Blade Recommendations
Shampoo Recommendations
For everyday use, mild/hypoallergenic shampoos are recommended.
- Mild/Hypo-Allergenic Shampoos
- Deep Cleaning Shampoos
- De-Matting/De-Tangling Shampoos
- Conditioning & Nourishing Shampoos
- Smoothing/Silky Shampoos
- Coat Specific: Whitening Shampoo / Apricot Shampoo
Conditioner Recommendations
- Intensive Conditioners
- Repairing & Nourishing Conditioners
- De-Matting/De-Tangling Conditioners
- Smoothing Conditioners